
How I built my Kubernetes Homelab – Part 6
In my opinion this is the easiest part of my Kubernetes learning journey. In this part we will install and configure the basic settings of Kasten K10. Karsten K10 is a special build Backup, Migration and Disaster Recovery solution from Kasten. Kasten is an independent Kubernetes Business Unit within Veeam. The acquisition of Kasten by Veeam was announce in October 2020. Beginning this year (2021) my employer started to education our (pre)sales about the Kasten. I started as well to learn and educate myself about Kubernetes in general to unterstand the underlaying concepts and wording. I cannot explain customers and partners how great a solution is, when I have no glue what Kubernetes and how our solution can help.
We start as always with an new namespace for our application. I configured the namespace “kasten-io”. Just because it makes sense and this is also the default in the Kasten K10 documentation. ;-)
marco@lab-kube-m1:~$ kubectl create namespace kasten-io
Before we start the deployment of Kasten K10, we need to run a Pre-Flightcheck. This can be done by a by running this bash script via bash command line. This output looks good, exept of the CRD API error, but I will use vSphere Integration, so we continue with installing the installation.
marco@lab-kube-m1:~$ curl https://docs.kasten.io/tools/k10_primer.sh | bash
  % Total    % Received % Xferd  Average Speed   Time    Time     Time  Current
                                 Dload  Upload   Total   Spent    Left  Speed
100  6072  100  6072    0     0  62597      0 --:--:-- --:--:-- --:--:-- 62597
Namespace option not provided, using default namespace
Checking for tools
 --> Found kubectl
 --> Found helm
Checking if the Kasten Helm repo is present
 --> The Kasten Helm repo was found
Checking for required Helm version (>= v3.0.0)
 --> No Tiller needed with Helm v3.5.4
K10Primer image
 --> Using Image (gcr.io/kasten-images/k10tools:3.0.13) to run test
Checking access to the Kubernetes context kubernetes-admin@kubernetes
 --> Able to access the default Kubernetes namespace

Running K10Primer Job in cluster with command-
     ./k10tools primer
serviceaccount/k10-primer created
clusterrolebinding.rbac.authorization.k8s.io/k10-primer created
job.batch/k10primer created
[...]
Waiting for pod k10primer-w7c2t to be ready - ContainerCreating
Pod Ready!

Kubernetes Version Check:
  Valid kubernetes version (v1.20.6)  -  OK

RBAC Check:
  Kubernetes RBAC is enabled  -  OK

Aggregated Layer Check:
  The Kubernetes Aggregated Layer is enabled  -  OK

W0424 20:59:42.130804       7 warnings.go:70] storage.k8s.io/v1beta1 CSIDriver is deprecated in v1.19+, unavailable in v1.22+; use storage.k8s.io/v1 CSIDriver
CSI Capabilities Check:
  VolumeSnapshot CRD-based APIs are not installed  -  Error

Validating Provisioners:
csi.vsphere.vmware.com:
  Storage Classes:
    nas-sc
      K10 supports the vSphere CSI driver natively. Creation of a K10 infrastucture profile is required.
      Valid Storage Class  -  OK

Validate Generic Volume Snapshot:
  Pod Created successfully  -  OK
  GVS Backup command executed successfully  -  OK
  Pod deleted successfully  -  OK

serviceaccount "k10-primer" deleted
clusterrolebinding.rbac.authorization.k8s.io "k10-primer" deleted
job.batch "k10primer" deleted
Now we can add the helm chart repo and start the installation of the Kasten K10 package. For this package we need to set two options. First we set the option “externalGateway.create”. This option will create an external gateway service with an IP from my metal loadbalancer to access it easier from my client. The second option “auth.tokenAuth.enabled” enables the token-based authentication, which I want to use in my homelab for now. Other authentication options can be found in the Kasten K10 documentation.
marco@lab-kube-m1:~$ helm repo add kasten https://charts.kasten.io/

marco@lab-kube-m1:~$ helm install k10 kasten/k10 --namespace=kasten-io \
    --set externalGateway.create=true \
    --set auth.tokenAuth.enabled=true
After some minutes we can check, if all of the pods are up and running.
marco@lab-kube-m1:~$ kubectl get pods --namespace=kasten-io
NAME                                     READY   STATUS    RESTARTS   AGE
pod/aggregatedapis-svc-fb7bd6cf5-p54lw   1/1     Running   0          21h
pod/auth-svc-565c4b4b66-rnkgv            1/1     Running   0          21h
pod/catalog-svc-7ccdc7c7c4-jpll7         2/2     Running   0          21h
pod/config-svc-5674469764-srjjz          1/1     Running   0          21h
pod/crypto-svc-8698d8b8d8-6g6vx          1/1     Running   0          21h
pod/dashboardbff-svc-5d6dd6bcc4-smm64    1/1     Running   0          21h
pod/executor-svc-58d8dd4c94-gw829        2/2     Running   0          21h
pod/executor-svc-58d8dd4c94-m59fr        2/2     Running   0          21h
pod/executor-svc-58d8dd4c94-mgrgn        2/2     Running   0          21h
pod/frontend-svc-5b7cd57b7b-xrvhl        1/1     Running   0          21h
pod/gateway-57458b7dd8-f7g5z             1/1     Running   0          21h
pod/jobs-svc-9c8b5c847-6rlxh             1/1     Running   0          21h
pod/kanister-svc-568ccf6c4b-2qnb7        1/1     Running   0          21h
pod/logging-svc-7d7ff5856d-bbbcx         1/1     Running   0          21h
pod/metering-svc-78b7cbc8c6-ndptn        1/1     Running   0          21h
pod/prometheus-server-78b94b85fb-m5nmv   2/2     Running   0          21h
pod/state-svc-9bff4fcf6-qdxg2            1/1     Running   0          21h
After all pods are up and running, we can check the service for the external IP of Kasten K10. This is the IP which we will used to connect and administer Kasten K10.
marco@lab-kube-m1:~$ kubectl get svc --namespace kasten-io gateway-ext
NAME          TYPE           CLUSTER-IP      EXTERNAL-IP      PORT(S)        AGE
gateway-ext   LoadBalancer   10.111.187.64   192.168.30.100   80:31700/TCP   9d
Ok, last but not least we need a token for the token based authentication. For this we need to create a serviceaccount and get the token for this account from Kubernetes. This token can be copied to our clipboard and copied into the authentication field in the next step.
marco@lab-kube-m1:~$ kubectl create serviceaccount kasten-sa --namespace kasten-io
serviceaccount/kasten-sa created
marco@lab-kube-m1:~$ kubectl create clusterrolebinding kasten-sa --clusterrole=cluster-admin --serviceaccount=kasten-io:kasten-sa
marco@lab-kube-m1:~$ sa_secret=$(kubectl get serviceaccount kasten-sa -o jsonpath="{.secrets[0].name}" --namespace kasten-io)
marco@lab-kube-m1:~$ kubectl get secret $sa_secret --namespace kasten-io -o jsonpath="{.data.token}{'\n'}" | base64 --decode
eyJhbGciOiJSUzI1NiIsImtpZCI6IkNaUENtQXB3WjRucFA5b1JMSU9HMnpTODRHempULW1WRVBmcHg1Q2Z2S3MifQ.eyJpc3MiOiJrdWJlcm5ldGVzL3NlcnZpY2VhY2NvdW50Iiwia3ViZXJuZXRlcy5pby9zZXJ2aWNlYWNjb3VudC9uYW1lc3BhY2UiOiJrYXN0ZW4taW8iLCJrdWJlcm5ldGVzLmlvL3NlcnZpY2VhY2NvdW50L3NlY3JldC5uYW1lIjoia2FzdGVuLXNhLXRva2VuLWg0bWI0Iiwia3ViZXJuZXRlcy5pby9zZXJ2aWNlYWNjb3VudC9zZXJ2aWNlLWFjY291bnQubmFtZSI6Imthc3Rlbi1zYSIsImt1YmVybmV0ZXMuaW8vc2VydmljZWFjY291bnQvc2VydmljZS1hY2NvdW50LnVpZCI6ImVlNDYzMzNiLTk2YzgtNDA3Ni04ZjQ4LTI2NzhkMDIzYTk5NyIsInN1YiI6InN5c3RlbTpzZXJ2aWNlYWNjb3VudDprYXN0ZW4taW86a2FzdGVuLXNhIn0.QTGLtENRmyNOmPTFDOmJhoykQWv9ikdf5FkUjbFrJJeMX14Y88EfRi0cRY2I5J9xSWKtjcC5vuxd47-4P8b9e4aDJ2dSG_tnRIv2uUSP3qSkj83l9EwkCnLEmw-MvsAGsneFQvbiXMfiLjqxNaD_2dQ9QC_BGNAxqp0COqVQJ37-9SdphwpReJrVgwmz5IkYVgSeVrquTOh8MfIaZjCDNeiC5wio6SZARaqcl2BwlBQINKbCAlbjjPxZdcEP9XjuU0u_d2plry-ZERNbbl1fVZTPQpB-9vMAoNqXDl8AfqsMJFfXz2XyZt1a_H367Bq1in6Ay1KrL7BywALx7Kj_Ew
Now we can switch to the browser of our choice. In my homelab I’m using Firefox on my jumphost, which is also my domain controller.
We now enter the URL http://192.168.30.100/k10/ and a login prompt appears, where we need to paste in the token from the last command.
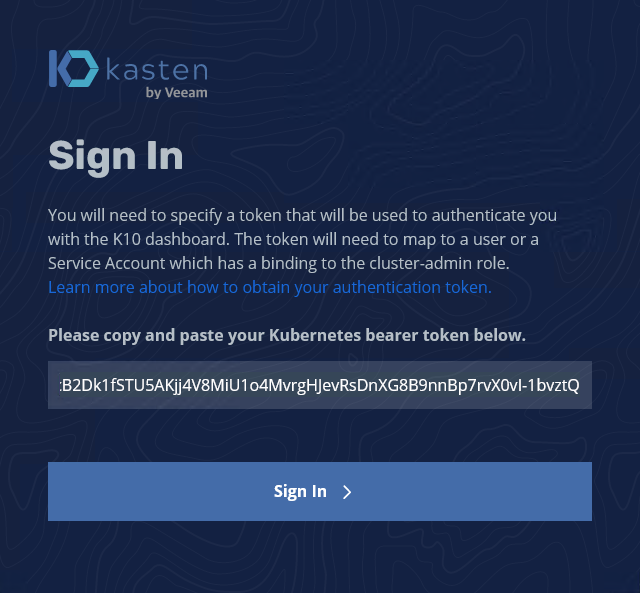
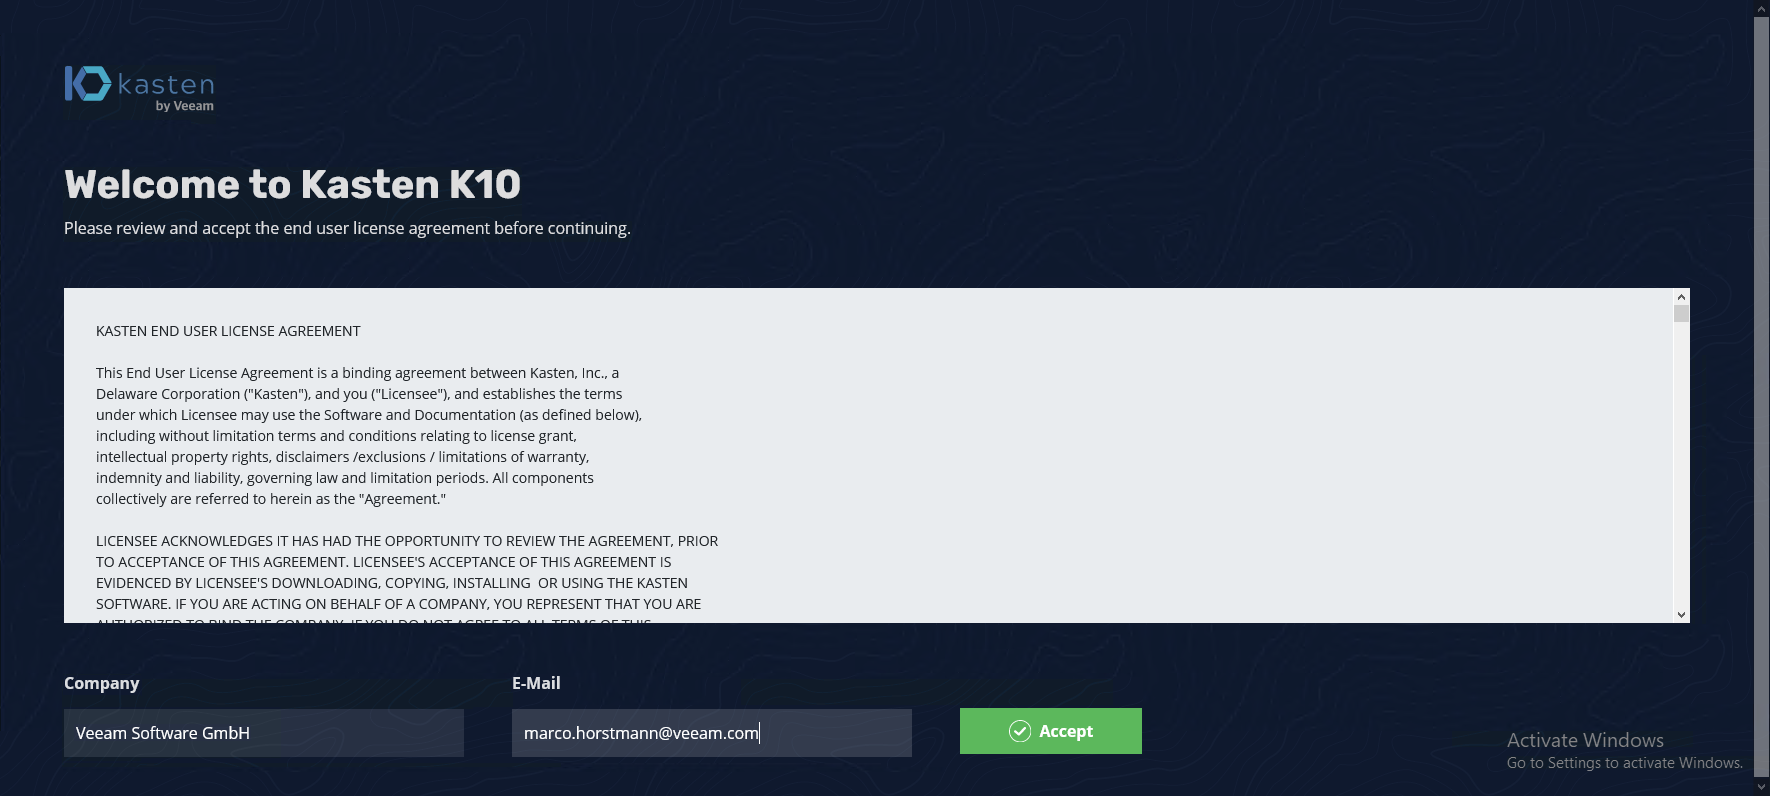
After an successful login we need to accept the Kasten End User License Agreement and provide a company name and an E-Mail address. Now the interface loads and you can take a quick tour through the K10 Dashboard, if you want.
Before we can configure Backup Policies we need to specify several settings. For this we click in the upper right corner on a menu item called “Settings”.
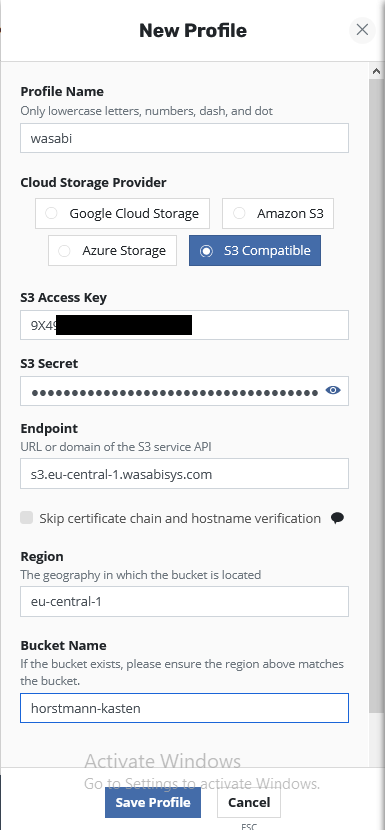
We should automatically arrive in the “Locations” sections and we select “New Profile”. This profile will be used for storing my backups. In my example I use Wasabi as storage. Wasabi provided me a long long time ago a free account to use their service and I still use it for my lab. If you want to create your own S3 Storage take a look into Minio. Minio is often used in our own labs if we want to have local S3 resources. Maybe later we will switch in our Homelab to Minio, too.
We need to provide a Profile Name which we will call “wasabi”. In the backup policies we can set this as Location and the export of the backup will be written into this location.
Next we can select a Cloud Storage Provider. Today you can only use Google Cloud Storage, Amazon S3, Azure Storage or an S3 Compatible, which is the one we need to activate for Wasabi. If you want to use an NFS FileStore, you need to activate this feature, which is in a preview state today and not supported in all configurations.
As usual for S3 buckets we need to enter a S3 Access Key and a S3 Secret Key.
The endpoint for Wasabi is in my case the European URL. If you want to give Wasabi a try and you are from other geo regions you can find the Endpoint URLs here.
We have a S3 Endpoint in eu-central-1 so we enter also this for the Region.
Last but not least we need to specify the Bucket Name. In my case the bucket is called “horstmann-kasten”. After this we will press “Save Profile” and we a a Location Profile.
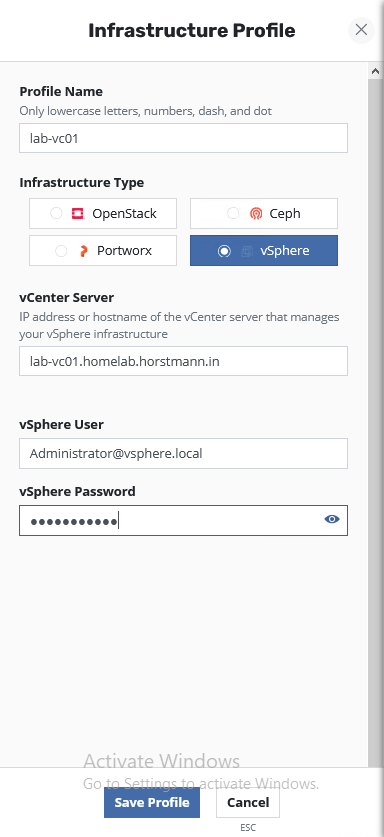
Next we click on Infrastructure and then we can need to add a Infrastructure Profile.
We need to enter a Profile Name and select a Infrastructure Type.
The vCenter Server needs to be added either by IP address or full qualified domain name. First I was thinking “Why this?”. It’s in the domain search settings of all nodes. But after I thought a little bit about this it’s totally clear. All K10 components are several pods and this pods don’t know where to locate the hostname. That’s the reason why we need to use the full qualified domain name.
As vSphere User I use my vCenter Administrator. For my Homelab usage this is the easiest option and I didn’t found a list which vSphere permissions is needed.
As last basic setting we will enable K10 Disaster Recovery. K10 Disaster Recovery backups the K10 Disaster Recovery (DR) protects K10 from the underlying infrastructure failures, accidental deletion of K10 or even the accidental destruction of the Kubernetes cluster on which K10 is deployed.
We only need to select a Location Profile and need to write enter a passphrase. After saving this settings. You can see the cluster ID.
In case of a Disaster Recovery you need:
- Credentials for the Location Profile (e.g. Access Key, Secret Key, etc.)
- cluster ID as shown in this screenshot.
- Passphrase to decrypt the backup.
For more information regarding Disaster Recovery, we can take a look into
the corresponding documentation page.


This was the installation and basic configuration of Kasten K10. In the next part we will create a a backup policy for my demo workload and discover the options we can set in a policy and will do some basic backup and restore tests.


