Combining Kasten K10 and Veeam VBR
Since some weeks we have the option to connect Kasten K10 with Veeam Backup & Replication. In this blog post I want to show you how you can configure it, what are the prerequisites for this and what you can expect from this integration.
Minimum Requirements:
- Kasten K10 version 4.5.6 (Tried this with 4.5.9)
- Veeam Backup & Replication 11a with Patch (Build 11.0.1.1261 P20211211)
- Kubernetes nodes running as VMs on vSphere 6.7 Update 3
- Persistant volumes provisioned by vSphere CSI provider (csi.vsphere.vmware.com)
If you cannot fullfil this requirements you can to stop read here. Only in this configuration the integration will work.
Prepare your Veeam Backup & Replication Repository
Before we can configure the location profile within Kasten K10 we need to allow the access to a VBR repository.

Veeam recommends to use either a Windows-based repository with ReFS file system or a Linux-based Repository with XFS file system. This is our recommendation because you can use fastclone function to reduce space usage.
You can select a classic repository or an Scale-Out Backup Repository and select “Access permissions…”. Every Backup & Replication Installation has an “Default Backup Repository” where “Allow to everyone” is set automatically. If you want to use another repository you just need to set it to “Allow to everyone” or only allow specific accounts and groups. This are users/groups which are local on your VBR server or when the server is member of an Active Directory, you can use AD users and groups as well.
Adding location profile to Kasten K10
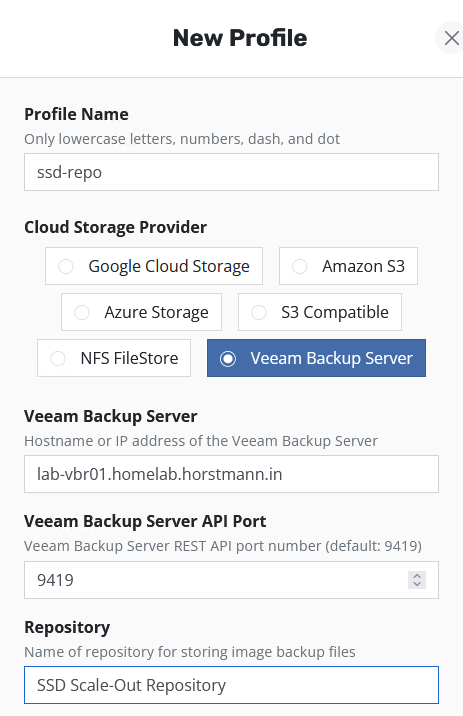
Now we can add the location profile to Kasten K10. For this we first need select the Cloud Storage Provider “Veeam Backup Server”. Then we need to specify the settings for the server. You need to specify the VBR server (where the Veeam Services are installed and not the repo server, which is often a different server.
In the field “Repository” you need to enter the exact name of the backup repository. This field is case-sensitive. I edited the backup repo in VBR and copied the name via clipboard.
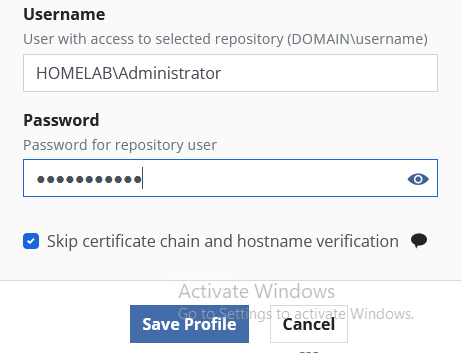
For authentication against the VBR service we used my domain admin but it can also be a user which we have added in the previous section.
Last but not least we need to activate the checkbox “Skip certificate chain and hostname verification” in my lab. I’m using as the most environments self-signed certificates and without this checkbox enabled we got a error message.
Configure the K10 policy
When you are edit or creating an policy you can enable “Enable Backups via Snapshot Exports”. Here you need to specify first a “Export Location Profile” as usual and select a NFS or object storage repository. In this repository all kubernetes related stuff like configMaps or secrets will be backuped. Only the persistent volume will be backuped to the Veeam Backup Repository.
What information can I see in Veeam?
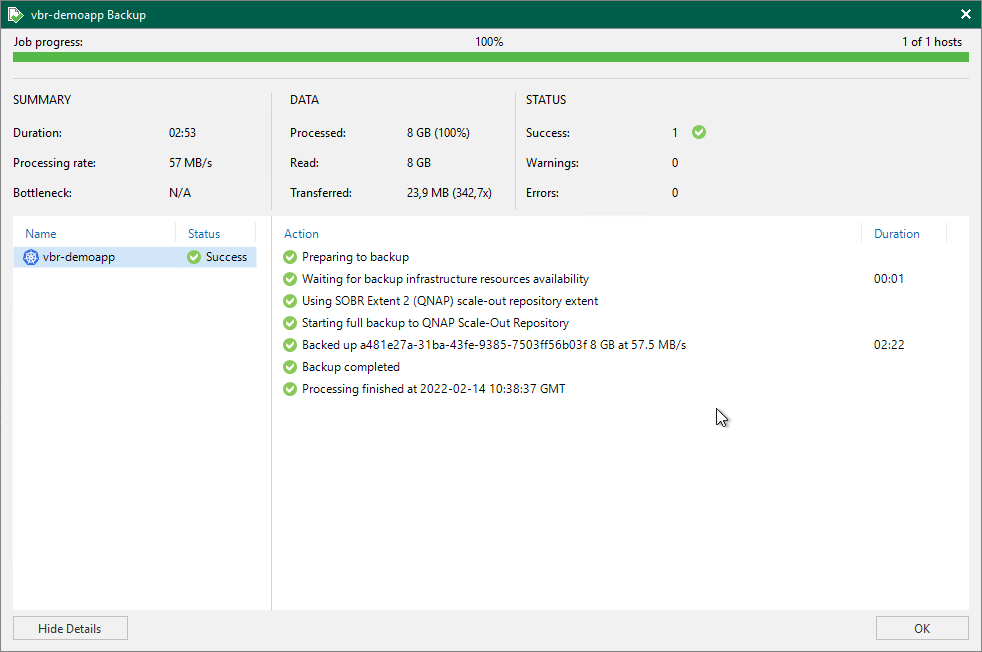
In Backup & Replication you can see some task information in the “History > Jobs > Backup” Section and when selecting e.g. the last task you see details like how many data was processed, read and how many data he needs to transfer to the Backup Repository.
In “Home > Backups” you can see all stored backups on disk and start some restores. I will explain in the next section what options you have to restore data from this backup.
You can even copy this backup via Backup to Tape Job to a tape device and store your backup offline. But keep in mind this is only the content of your Persistant Volumes without anything like ConfigMaps or Secrets.
Which options do I have to restore this backups?
In this section we will only cover the additional options you will have to restore backups with Veeam Backup & Replication.
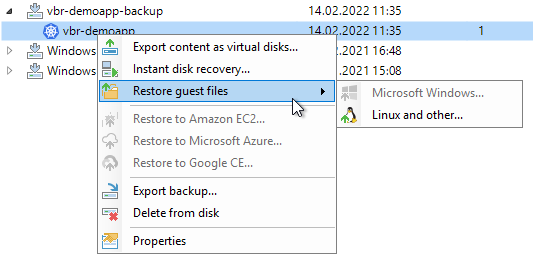
When we select the backup with the right click we have several restore options. The first one is to export the content as virtual disks. It starts a wizard where you can select the “virtual disks”, in this case of cause the Persistent Volumes, from which restore point and where you want to store it as VMDK/VHD(x).
The second option is to mount a “virtual disk” as First class disk (FCD) directly from our VBR Backup Repository. You can select/use it later in your application.
Single file recovery
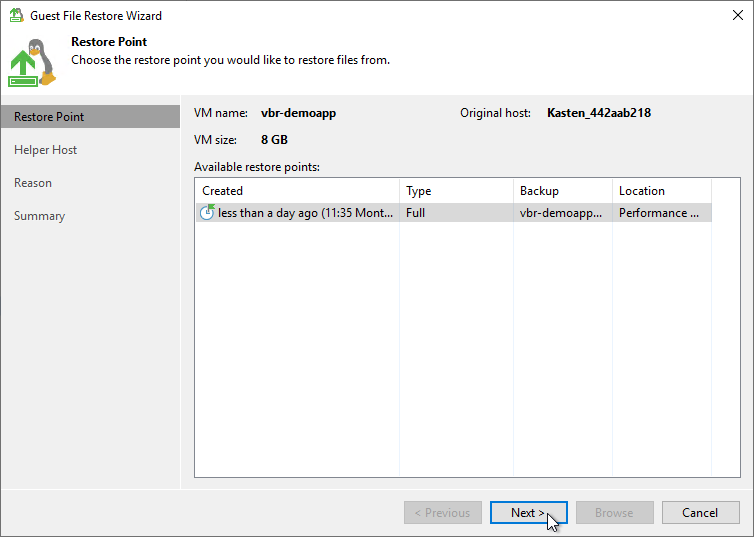
In our case we will use the option “Restore guest files > Linux and other…” to start a wizard which allows us to select a specific restore point. Each restore point is shown als full backup but we are using ReFS/XFS fastclone function in background to save space.
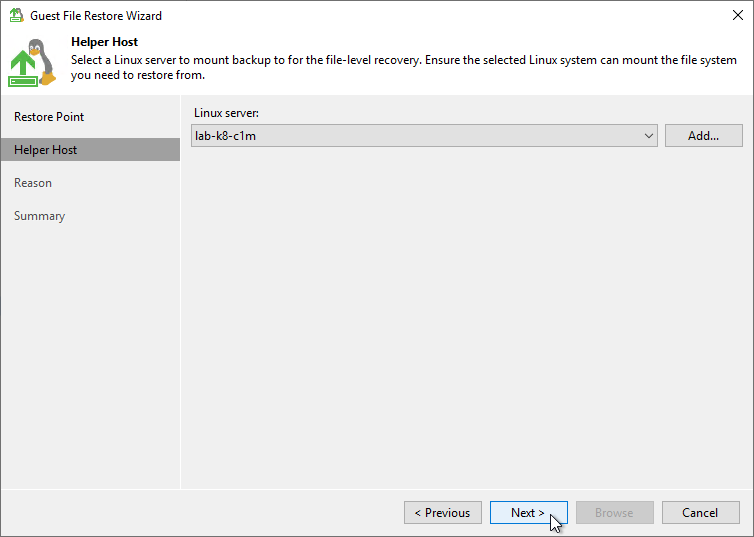
Now we need to select a Helper Host. You can either select to use a temporary helper appliance included in Veeam Backup & Replication or in my case I added an existing Linux server. On this server the Veeam installer service will be installed. For this we need root permissions to the system. This can be maybe a admin workstation or e.g. jumphost. In my case this is my kubernetes master node. We click on “Next” button when we have selected a system.
The next page is just a text box to enter a restore reason which can be just skipped via “Next” button.
After this we will get a summary of our restore settings and when we click on the “Browse” button
the FLR Browser will start.
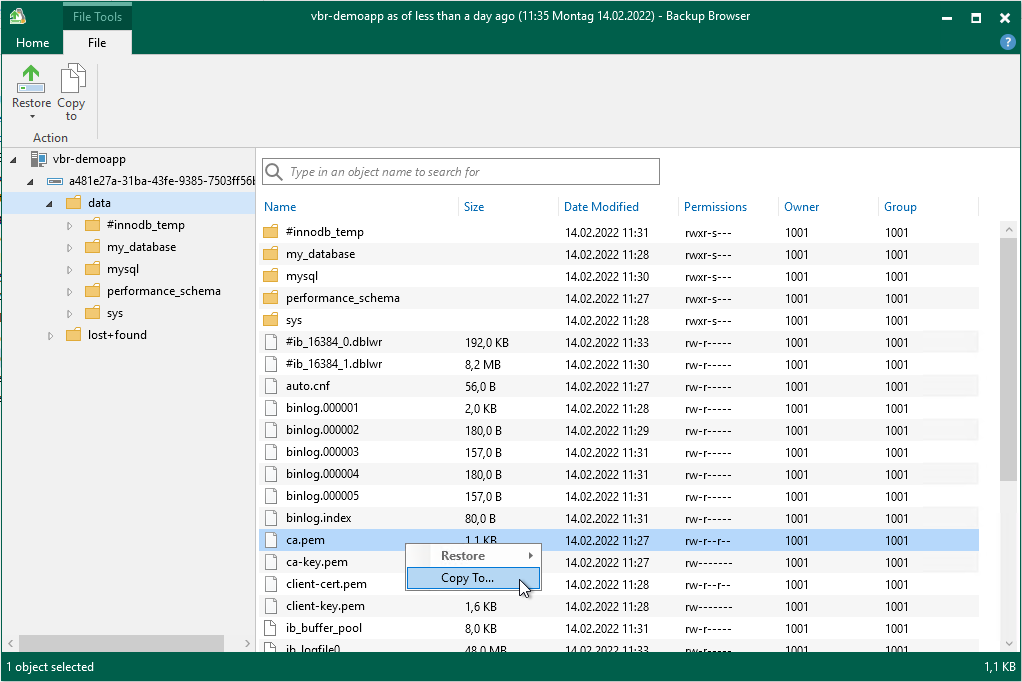
When the explorer is started we can now browse the filesystem of the Persistent Volume and select files and folders we want to restore. Because VBR cannot restore directly into a pod or container we need to select “Copy To…”.
Now we can select a registered system e.g. one of my linux boxes I’ve registered to VBR before and select a folder where we want to restore the files to.

After restore is started we will see this progress bar and at the end we will see how many data and how many files/folders was restored.
Ok, but how we get data back into the container? Here comes kubectl to the rescue. kubectl has a command to copy files to and from containers. In this example we copy the restored file to my pod:
marco@lab-k8-c1m:~$ kubectl cp restore/ca.pem mysqldemo/mysql-0:/tmp/ca.test

marco@lab-k8-c1m:~$ kubectl exec -n mysqldemo  mysql-0 -- ls -l /tmp
total 8
-rw-r--r-- 1 1001 root 1112 Feb 14 21:37 ca.test
srwxrwxrwx 1 1001 root    0 Feb 11 23:28 mysqlx.sock
-rw------- 1 1001 root    3 Feb 11 23:28 mysqlx.sock.lock
I hope this blog post was helpful for you to see that you can do when combining Kasten K10 with Veeam Backup and Replication.


